Saturday, April 2, 2016

Another Legacy Redwood Poject Piece

Wow, I didn't realize it had been so long since I last posted, so let's get back into it!

In preparing for an upcoming show, I was casting about for ideas of what to make that was new and different, and I remembered that I had designed a room divider/screen for the Legacy Redwood project that I've written about over the past few years. So after consulting with the client to get the OK, I went for it with the screen.

This piece was designed to take advantage of the unique shape of one of the slabs that we had that included an interesting void from an old burn scar ...
 

The only problem was that after 20-odd years out in the weather, there was a lot of box checking, and so there was a good chance that any slices that were milled off of it would be very fragile, at best. But, no matter, I took it down to Steve Jackel's place in Watsonville, Jackel Enterprises, put it on their band mill, and we started slicing. 


Not surprisingly, as the slices came off, they did, indeed, start to fall apart as we lifted them. But I managed to get them back to the shop with their pieces taped together and then went about stabilizing them.

To give these slices some structural stability I basically soaked them in epoxy. First, the pieces were assembled in their correct places, then the whole slice was covered with self-adhesive carpet protector film, to act as a giant piece of tape.


The slice was then flipped over and two-part epoxy was simply poured over the entire slice and allowed to soak in. Just as in finishing with oil, as the epoxy soaked into areas and became dry, more epoxy was poured on.


 After the epoxy set, the film was removed, the slice was flipped, and more epoxy was poured onto the second side. In the photo below, you can see the slice on the left has been partially sanded.


The epoxy did a great job stabilizing the slices. So then it was just a matter of making the frames and assembling.The frames are made of quartersawn sapele (a type of African mahogany), and the lower panels are redwood burl from one of the other chunks in this project.


The two halves of the screen are articulated with solid wenge hinge blocks.


And the natural edges of the redwood slices are held in place with stainless steel pins.


All in all, it weighs a ton (80 lbs, to be precise) , but I think it turned out rather well. 


For more photos of the finished piece, check out the shop's Facebook page in the near future.

Wednesday, June 25, 2014

The Legacy Redwood Project Continues

After a hectic Spring, I finally had a chance to tackle the first furniture piece from the legacy redwood project. The first "chunk" to be used was really more of a waste piece that was left over after all the larger pieces for milling were separated from the original round. It was a funny little triangular piece whose shape was complete happenstance. 


This piece had a big bark inclusion and had many large cracks and splits that precluded slicing it up. So, the task was to see what could be made of it as is. After playing around with various orientations I settled on a rather unconventional plan to use if tipped up on its point as a console table base. 


The real trick to this piece was to keep 70 lbs of wood and glass stable. You can see in this drawing that the original idea was to have a steel post inserted into the bottom of the wood. After more thought and consultation with my personal engineering guru, David, that idea was abandoned for an approach that involved a steel bracket that could cradle the slab and bolt to it. I had the bracket fabricated by local metal artists Paul and Forrest Cheney of Cheney Metals. The bracket bolts to the solid wenge base, and then attaches to the wood slab with lag screws.


Before the wood could be mounted in the bracket, though, the severe checking would have to be dealt with to stabilize the slab. To do that, I ran two 16" long screws made for log cabin construction all the way into the slab parallel to each side to bridge the major sections of the slab.


Once everything was secured, it was just a matter of adding a glass top, along with a steel rod to support the glass in the bark void.


With a good penetrating oil finish the figure really popped out, and this little afterthought of a chunk became a beautiful piece of furniture.


The biggest problem my client will have now is deciding which side to display. 

Stay tuned for the next installment as this project continues on.


Monday, February 24, 2014

Further Adventures in "Back to Basics" Woodworking

As I've said before, sometimes its good to get back to basics, if only to remind us how lucky we are to have the things we have that make our jobs easier. I've just returned from my fifth trip to Tanzania with a medical team from the Phil Simon Clinic of Huntington Hospital in Pasadena. Not being a medical type, my duties are generally infrastructure- and administration-related. Working alone, and with only hand tools, I've generally only had the time to build maybe a set of shelves, or a table, with the short amount of time available. This time, though, there was another team member along who was a general contractor, so things were looking up.  

My woodworking task on this trip turned out to be to make as many storage shelf units as I could in a couple of days to help outfit the dispensary building at the clinic we were working with in a small village called Kisongo, on the outskirts of Arusha. As with any project, the first task was to find some materials. And this time, that was pretty easy. It turned out that here was a lumber seller just about 100 yards from the building we were going to be working in.


With the help of Joyful, one of our drivers, translating for me, I was able to pick a batch of 1x8 pine boards, which the proprietress, Edith, was also able to have surfaced for me. And the best part was, they even delivered the milled lumber right to our door.


The biggest trick in designing the shelves was to figure out how to do the least amount of cutting, since it was all hand work, and the wood was still very wet, as well as the least amount of joinery. The first unit we made was a 16" deep unit for the main clinic room. It was strictly a board and batten affair, with screwed butt joints for joinery. As it turned out, not only was Dave the contractor interested in my Japanese hand saws (he's more of a large-scale metal fabricator guy), but several of the drivers, when they weren't busy translating, wanted to get in on the action, as well. In no time we had a little production line going with me marking and the guys cutting.


The cut parts came to me for drilling, and then we all got in the act during assembly.


In just a few hours, we were able to fabricate the entire 5' high x 5' wide unit. Then the next day, again in just a few hours, we fabricated two more single-board depth shelf units for the pharmacy room to organize medications.


In all, the six of us were able to make a significant contribution to the dispensary in a very short amount of time.


Our team (l to r): Mtili, Dave, Aron, Joyful, Albert, and me, with Woody, Dave's creation from  scraps, in front. Later on, since this room was being used for the pediatric clinic, one of our nurses, Ashley, even gave Woody a colorful makeover.


To find out more about the Phil Simon Clinic's Tanzania Project, check out their website or Facebook page.

My thanks to Michael Eastwood for several of the photos.

Friday, January 17, 2014

Legacy Redwood Project: The Good, the Bad, and the Ugly

After a flurry of activity in the shop at the end of the year, I finally got a chance to take the next step on the legacy redwood project. That entailed reloading all the big chunks I had cut back in November into the truck and taking them out to Dave Merchant's milling operation at Out of the Woods in Bonny Doon. 


Dave's got a great set-up, with several types of mills. 


The purpose of this trip was to remove the weathered outer surfaces of the chunks to try to assess how much sound, usable material the was in each one. My "smaller" chunks, the ones less than about 25" in width were sliced on a computer-controlled Woodmizer band mill - essentially a giant horizontal band saw.


The larger chunks that didn't fit on the Woodmizer were moved to his Lucas mill. This mill uses a large circular blade that can be rotated and used in both the horizontal and vertical positions. On these chunks, material was removed in roughly 6" wide pieces.


Now that each piece has a clean face, I can assess which ones still have significant rot, which will yield usable large-scale wood, and which might yield thinner panel material. Some of the pieces look pretty promising, with some really great burl figure, but others were a little disappointing in their extent of weather-related checking, and rot.


Stay tuned to see what develops ....

Saturday, November 16, 2013

A Special Legacy Project

Even though the furniture I create for my clients is always specially designed for each of them and their environment, the materials used to execute the designs, while of high quality, are usually commercially sourced.

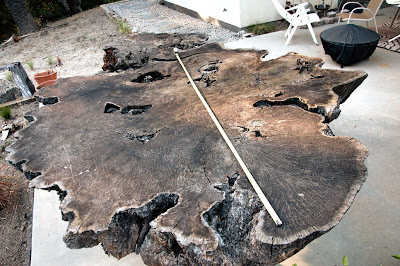
By contrast, I've recently been given the opportunity to undertake a very special legacy project. A client recently contacted me with a very interesting challenge. She said she had a large redwood slab that she wanted turned into furniture. Turns out, "large" was an understatement! For reference, the tape measure in the picture below,  is extended 8 feet.


In all, the slab measured better than 8' by 12' by about 11" thick. It was milled from an old-growth stump on the property by her late husband, and functioned as an outdoor table for 12 years. Now she wanted to repurpose the material into furniture pieces for herself and her children. 

Obviously, the first step was to parse the slab into managable pieces in order to assess how much usable material there really was. A task that required two trips, and was helped greatly by my friend Matt Werner.


And boy, we got quite a pile.


My biggest fear was that after 12 years outdoors, the many cracks and splits in the surface might have allowed weathering and rot to extend far down inside. But to my surprise, once we started cutting, we found that only the very surface was weathered, with perfectly fresh material underneath - a testament to the weather-resistance of redwood.


The bigger problem will probably turn out to be pockets of rot caused by water being trapped underneath the slab by plywood that was used as a sub-assembly to attach legs.

The next step will be to take the slabs to a sawyer to have the top and bottom surfaces exposed and flattened .... stay tuned!


Curvy Nightstands Slide through the Home Stretch

Once the outsides of the legs were shaped it was time to shape the front faces of the legs to better define their curvy shape. This was done using a simple jig and pattern-following router bit while the case was dry-fit together.


The last step for the case parts was to finish the joinery - the shelves were joined to the sides with Dominos, while the top was joined with dowels. The latter were located using a simple shop-made positioning jig.


The bodies then went together very nicely, albeit with a lot of clamps!


The next step was to add the drawers, and of course, curvy sides deserve curvy drawers (or at least drawer fronts). To ensure smooth running of the drawer slides, the inside of the case was made square, but the drawer fronts were shaped to follow the curvature of the legs faces. Once the drawers were mounted, handles were fashioned out of solid wenge to match the rest of the accent trim.

The final result was very satisfying.


Now they just have to make their way to the other side of the country!

Thursday, October 3, 2013

Sledding Through the Curves

How do you make a perfectly fair curved surface out of solid wood that's 20" wide , 28" long, and almost 3" thick? That was the challenge of the latest project in the shop. The project is a pair of nightstands made of solid mahogany, and based on a Klismos-inspired stool I made last year. 


I know what you're saying .... go find a 20" capacity bandsaw and just cut the curves. Easier said than done, and then there would still be the challenge of building a jig to keep the slender blank perfectly perpendicular to the saw table - no easy feat. Ultimately, I decided to stick with the equipment I had, for convenience. Since I only have a 12" capacity bandsaw, and the premium pattern-grade Sapele I was using was only about 6-8" wide, the sides would have to be glued up in three pieces.


To strengthen the joints, I added dowels, which were positioned properly in the blank using a shop made drilling jig.


After the dowel holes were drilled, the outline of the side was cut using the bandsaw. The blanks were then glued up and set into a fairing jig. 


The fairing jig works with like the setup often used to flatten large slabs with a router. The sides of the lower part of the jig are the exact fair arc that describes the curve of the nightstand side. Riding across these is a sled, along which a trim router rides. As the sled moves along the curved rails a series of narrow flats is created.


The faired surface can then be sanded smooth, resulting in a fair curved nightstand side. 


Bandsawn blank (L), rough faired blank (R), and sanded fair side (bottom).

The faired sides can then get their joinery cut and the nightstands take shape - stay tuned....