Even though the furniture I create for my clients is always specially designed for each of them and their environment, the materials used to execute the designs, while of high quality, are usually commercially sourced.
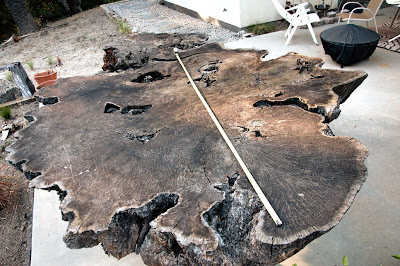
By contrast, I've recently been given the opportunity to undertake a very special legacy project. A client recently contacted me with a very interesting challenge. She said she had a large redwood slab that she wanted turned into furniture. Turns out, "large" was an understatement! For reference, the tape measure in the picture below, is extended 8 feet.
In all, the slab measured better than 8' by 12' by about 11" thick. It was milled from an old-growth stump on the property by her late husband, and functioned as an outdoor table for 12 years. Now she wanted to repurpose the material into furniture pieces for herself and her children.
Obviously, the first step was to parse the slab into managable pieces in order to assess how much usable material there really was. A task that required two trips, and was helped greatly by my friend Matt Werner.
And boy, we got quite a pile.
My biggest fear was that after 12 years outdoors, the many cracks and splits in the surface might have allowed weathering and rot to extend far down inside. But to my surprise, once we started cutting, we found that only the very surface was weathered, with perfectly fresh material underneath - a testament to the weather-resistance of redwood.
The bigger problem will probably turn out to be pockets of rot caused by water being trapped underneath the slab by plywood that was used as a sub-assembly to attach legs.
The next step will be to take the slabs to a sawyer to have the top and bottom surfaces exposed and flattened .... stay tuned!


