Saturday, December 3, 2011

Triple Duty Furniture for a Bright and Sunny Room

The latest project in the shop is a set of seating units designed to flesh out a currently rather empty sun room. My client's home has a great sun room that started life as a porch across almost the entire length on the house. A previous owner had turned the porch into a room with large windows all the way around. Its a bright and airy, west-facing space, with views of agricultural fields and the Monterey Bay. It has the potential to be a great place to curl up and read or enjoy the view. But what it needed was softer surfaces to add some warmth, and storage for the owners' large book collection. It would also have to act as guest quarters for their relatives' kids during family visits. That means they have to do triple duty. First they have open shelving below, for book storage and display.

Second, by day they're window seats for lounging and nature-watching. To help with the lounging part, the potentially "dead" corners are filled with deep storage chests that double as backrests for the adjoining seats.


By night two of the seats expand to become 48" wide beds. To expand, the bed units have two-layer tops hinged at the front. The face frame of the seat slides forward to act as the outboard support, and then the top merely folds out. To facilitate a smooth transition to sleep mode, seat and cushion sizes were designed so that the cushions from non-bed seats fit exactly into the open spaces of the bed units to complete the sleeping surface.


Stay tuned for more on the construction techniques used to execute these pieces.

Sunday, September 25, 2011

Shapely Legs Make Graceful Nightstands and a Successful Set

In the last post I talked about the stylistic and technical aspects of the bed frame. After the bed was done it was time for the nightstands. The key to the graceful look I wanted in the nightstands was the leg shape. Straight-sided trapezoidal legs might have been a good compliment to the bed, but they didn't look very feminine (left, below). The key to making them graceful, yet still related to the bed, was to use similar materials, and similar proportioning, but soften them with curved leg profiles (right, below).


And the key to successfully constructing them was proper materials. This meant making the legs out of a single piece, rather than laminating smaller pieces. So I used 12/4 (nominally 3" thick) hard maple, which allowed me to control the grain orientation as it related to the four leg faces. The way to ensure the most consistent grain on all faces is to have the end grain running as close to 45 degree as possible to all the faces. To lay this out I made a simple marking jig with an opening that was 2-3/4" square. That allowed me to optimize the grain direction.


Once the leg blanks were milled, I used a simple paper template to lay out the profile on the two outer faces.


To mill the profiled legs, I first cut the profile on one face (left, below), then taped that offcut back onto the leg (middle, below), turned it 90 degrees, and cut the adjacent profile (right, below).


You'll notice that in both of the photos above, you can see that all the joinery was cut while the leg was still square - very important!

The curved leg shape made all the difference in keeping these nightstands substantial enough to hold their own with the bed design, but still project a softer presence. To further help them relate to the bed, the drawer pulls were hand shaped from the same figured claro walnut as the head- and foot board accent squares, using similar opposing arcs to the bed.


The pièce-de-résistance that really let them stand out on their own, though, was the use of highly figured quilted maple for the tops. The tops were veneered with shop-made 1/16" veneers cut from a single billet of wood and book-matched, which made for a great effect.


When all these elements were put together, the end result came out great, and struck just the right balance.


Put it all together, add in some great Japanese prints my client got in Tokyo, and the set was a great success that I'm really happy with!


Thursday, August 11, 2011

An Asian-inspired Bed with Nightstands

The current project in the shop is a real 180 from the last one. This project has a light and airy design, and is made of all solid wood.

My client came to me wanting to replace a large and imposing bed made in the Mission style from fairly dark wood. The old bed was visually heavy, and dominated the room. What she wanted was a more feminine design that was much lighter, both visually and color-wise. What we came up with was a light and airy take on the iconic Japanese Torii gate.


A great example of the classic Torii gate.

The house has many classicly Arts & Crafts features, including lots of Douglas fir trim work. We explored several possible design directions in varying degrees of Mission/Arts & Crafts and Asian styles. After a few iterations, we ended up a mixture - a Torii-inspired bed with more Missiony nightstands, which we lightened and made a little more feminine by adding a few curves. To maintain a lighter feel, the set will be made of maple, with Douglas fir panels.

Our final design.

After turning a handful of 10' boards into a pile of part blanks, construction started with the foot board sub-assembly. The first task was to create dadoes for the dark wood accent squares. Because the profiles of the pieces they join are curved on both sides, these had to be milled while the part blanks were still square.


Steps for attaching the dark squares.

The dadoes were made using a simple jig and a top-bearing router bit. As you can see, the first step was to make shoulder cuts with a handsaw (shown by the arrow). Then about a third of the material was removed with a chisel. Next, the jig, whose "fingers" were the exact size of the dadoes with the correct spacing, was clamped to the workpiece and waste material was removed with a router. Once this was done, the curves could be shaped. Layout for the curves was accomplished with a simple flexible batten and a couple of small nails.


Laying out a curve.

Once the parts were shaped, the rest of the assembly was constructed using half-lap joints. Cut with a similar technique used for the accent dadoes, shoulder cuts were made by hand, the majority of the waste removed with a chisel, then the joint was finished with a top-bearing router bit (using the shoulder cut as the "template"), and fine-tuned by hand with a chisel.


The half-lap joints of the foot board.

The head board will be made the same way, with accent squares and half-laps. Stay tuned.....


Tuesday, August 9, 2011

The Museum Exhibit is open!

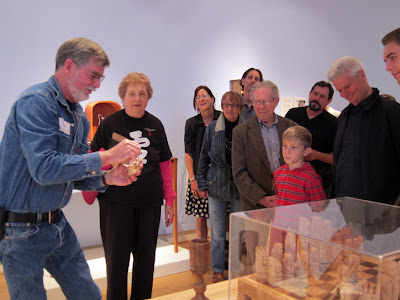
Last week, to much fanfare, our "Studio Made: Santa Cruz Woodworkers" exhibit opened at the Museum of Art and History in Santa Cruz. There was first an invitation-only opening for Museum members, and then we had a general "opening" for the public during First Friday, which included a noon walk-through with the makers that gave us a chance to really get to interact with the public. Both were very well attended (I heard over 800 people came to the First Friday evening reception), and everyone was in agreement that the quality and range of works was very impressive
.

The exhibit entrance.


Still being set up the day before the opening.


The members' opening.


Tina Heitzman talking about Roger's incredible desk and chair.


Ron Day talking about his armoire.


Ron Cook demonstrating his wooden padlock.


Om Anand discussing perching chair design.


Me talking about my jewelry cabinet.


Matt Werner describing the finer points of marquetry.


Josh Salesin talking about various turning techniques.

The Museum of open 11-5 Tuesdays to Sundays through November 13th. Plus, entrance is free on the first Friday of each month. To learn more about the various extra programs associated with this exhibit, like presentations about urban forestry and a lumberyard tour, check out the Museum's website - www.santacruzmah.org.

Thursday, July 28, 2011

The Renee Taylor Gallery

Well, it was an interesting journey over mountains and through deserts, but the Gallery display cases made it to Arizona all in one piece - a minor miracle, given the state of the highway system (nothing will give you a new perspective on the state of America's road conditions like being stuck in the right lane in a giant truck with rock-hard suspension for 800 miles!).

The installation went smoothly, thanks to the excellent help of my friend Jeff Hagar - I couldn't have done it without him (stay tuned one of these days for the blog posts of the bathroom remodel he earned!).

Here are some shots of the space - if you find yourselves in Sedona, I encourage you to drop by the Vue Gallery and check out the great space, great art, and some very spiffy display cases, if I do say so myself!


The "before" shot of the space.


Cabinets everywhere!


The final result.


The front set of cabinets, as you walk in the door.


The rear set of cabinets in the interior of the gallery. Notice the great soffit design feature the owners put in that directly mirrors the foot print of the display cases. Their builders were in making templates directly from the cases the day I left.


Fifteen feet of storage cabinets behind the counter.


Another view of the cases showing the waveform accenting on the case fronts, as well as the light soffit above.

Friday, June 3, 2011

Woodworkers on the forefront of technology!

We woodworkers often get the reputation of being hermits, toiling away with the same basic tools that were used hundreds of years ago. But here in Santa Cruz, we're charging headlong into the 21st century.

For our upcoming exhibition at the Santa Cruz Museum of Art and History, the Santa Cruz Woodworkers are taking a cue from our brethren over the hill in Silicon Valley, and going high-tech. To enhance the museum-goer's experience of our exhibit, we're all going to create web content about our pieces that will be accessible in real time, right on your smart phone using QR codes. For those who aren't familiar with these, QR (quick-response) codes, are 2-dimensional bar codes that can be read with a smart phone camera and decoded by any number of free reader apps that will take the user instantly to a website, audio or video clip, or any other kind of content. For example, this is the QR code for the my website (www.msfinewoodworking.com) ....


When visitors to our exhibit want to know more about any of the pieces on display, each label will display a specific QR code that will take them instantly to more in-depth information, like a slide show, audio description, or video presentation.

These codes are the leading edge of new multimedia technology, and true to our Santa Cruz locality, we're "riding the wave" of the future. Please come to the exhibit July 30 through November 13, 2011, and see our work.

Things are taking shape, literally...

The Gallery cases are definitely taking shape at a better pace now. Through a stroke of very good luck, and very generous new neighbors, I have been able to store all the parts and completed cabinets right next door to my shop. At first the extra 400 sq. ft. seemed plenty generous,


but even with fewer than half the cabinets, its filling up quickly!


Progress has been pretty good since the last blog entry. The three credenzas were the first cases to be assembled. These were constructed using a technique called floating tenons. In a nutshell, matching mortises are cut in the various mating parts, then a matching tenon is inserted upon glue-up. These were made using Festool's Domino mortiser. After the parts were all mortised, they were taped to catch as much glue squeeze out as possible...


Then all it took was gluing in several dozen little Domino tenons and getting them all to line up all at once! The trick in this kind of construction is to get good clamping pressure all the way across the joints. For this an arc-shaped clamping caul is a real life saver. A caul is piece of wood used to spread clamping pressure more evenly across a joint. You can see from the highly technical schematic diagram on the caul itself that one face is left straight, while the other is planed to have a slight arc; in this case, about a 16th to 3/32 inch at each end.


When the curved face is put against the work piece and clamping pressure is applied at the ends, the caul bows applying even pressure across the entire case width, without having to have deep-reach clamps.


The credenza cases are now off at the finisher's, and will get their drawers and doors fitted after finishing.

With those out of the way, it was time to dive into the curved display cases.

One of the big challenges of the display cases is ensuring uniformity, so that when installed next to each other, all the doors, drawers, etc., line up just right. To make that easier, positioning jigs were made from scrap MDF. These were simple square spacers made to help locate each part relative to the others before being joined....


Once all the flat pieces were joined, the double-thickness curved front piece was attached....


Once the basic case assembly was completed, the curved front was trimmed flush with the sides and the outer curved layers were added. Each case has two outer layers, each with a wave-form shaped edge. The process for each layer was the same, and included first trimming the layer to length, then cutting the wave shape, fairing the cut edge by hand (these steps were done with the work piece strapped to the original bending form for ease of handling), then finally gluing it on and applying band clamps....


Mounting of the two outer layers has to be done in the same order that the cases will be installed, so that when installed the wave shape flow smoothly from one cabinet to the next....


Two down, nine more to go!


Monday, May 2, 2011

The Gallery cabinets continue...

Well, the gallery cabinets are starting to roll now. The flat parts are nearly finished being cut, and the curved pieces are almost finished being glued up. The curved parts are all shaped using bending forms. I ended up making 6 different forms for the 8 types of parts needed.

For the toe kick fronts, the forms are simple - multiple layers of MDF with a curved edge, The 2" wide kick fronts are glued together by simply clamping the glued parts to the form ....


The curved display case fronts, though, require more complicated forms. The forms are made of ribs cut to the required radius, which are then joined with cross-braces and solid wood ends. This frame is then skinned with a layer of bending plywood....


Since the edge of each cabinet front layer will be shaped, the layers have to be veneered and bent separately before shaping, then the layers joined together. To maintain the correct radius of each successive layer, all three are glued up at once. It's a little tricky, but with a system, it works fairly smoothly. In a nutshell, each glue-up requires 7 components - the main layer is made of two pieces of bending plywood and a veneer covering, and the two outer layers each consist of one piece of bending plywood and one of veneer - after glue is applied to all surfaces, each layer's veneer and substrate are taped together to keep things from shifting .....


Next, the three layers are stacked and filler strips are added to maintain an even thickness throughout the entire packet. A hardboard caul is then added, and the whole packet is taped down to its form .....


Then the whole thing is put into a vacuum bag and pressed ....


You might also have noticed the big chalk arrows on the veneer faces - those are to help maintain a consistent grain direction an all parts. One of the great properties of the khaya (a type of African mahogany) that I'm using for this project is that, like all mahoganies, it has great luster, but the luster is directional. Meaning that if you were to rip a piece of wood into two halves and flipped one 180 degrees, the two halves would look different in terms of color (one being darker than the other). This is due to the directional nature of the wood fiber cells, and the way light refracts entering and exiting the cells. So, for a consistent look, its important to make sure all the cabinet fronts have their grain running the same direction - hence, the arrows!

Stay tuned .....

Wednesday, April 6, 2011

Swoopy Gallery Cabinetry

The latest adventure unfolding in the shop is a rare (for me, anyway) commercial project. It involves a number of cabinets for an art gallery in Sedona, Arizona. The project includes over a dozen partially glazed, curved-front jewelry display cases, three storage credenzas, and a couple of point-of-sale stations, all for a new retail space the gallery has just taken over.


The cases are being made using certified veneers of ribbon-grain sapele and khaya, two species of African mahogany. The overall layout of the display cases forms a very organic curvilinear space, and involves four different cabinet shapes, utilizing two different basic radii.


The curved fronts will be given even more dimensionality with the use of multiple layers, which will themselves have undulating edges. The combination of linear-grained veneers and curvaceous shapes will give them an exciting visual presence, but the use of consistent color and grain will ensure that what's inside the cases is the real star.


Stay tuned to watch this complicated project take shape ......