Friday, June 3, 2011

Woodworkers on the forefront of technology!

We woodworkers often get the reputation of being hermits, toiling away with the same basic tools that were used hundreds of years ago. But here in Santa Cruz, we're charging headlong into the 21st century.

For our upcoming exhibition at the Santa Cruz Museum of Art and History, the Santa Cruz Woodworkers are taking a cue from our brethren over the hill in Silicon Valley, and going high-tech. To enhance the museum-goer's experience of our exhibit, we're all going to create web content about our pieces that will be accessible in real time, right on your smart phone using QR codes. For those who aren't familiar with these, QR (quick-response) codes, are 2-dimensional bar codes that can be read with a smart phone camera and decoded by any number of free reader apps that will take the user instantly to a website, audio or video clip, or any other kind of content. For example, this is the QR code for the my website (www.msfinewoodworking.com) ....


When visitors to our exhibit want to know more about any of the pieces on display, each label will display a specific QR code that will take them instantly to more in-depth information, like a slide show, audio description, or video presentation.

These codes are the leading edge of new multimedia technology, and true to our Santa Cruz locality, we're "riding the wave" of the future. Please come to the exhibit July 30 through November 13, 2011, and see our work.

Things are taking shape, literally...

The Gallery cases are definitely taking shape at a better pace now. Through a stroke of very good luck, and very generous new neighbors, I have been able to store all the parts and completed cabinets right next door to my shop. At first the extra 400 sq. ft. seemed plenty generous,


but even with fewer than half the cabinets, its filling up quickly!


Progress has been pretty good since the last blog entry. The three credenzas were the first cases to be assembled. These were constructed using a technique called floating tenons. In a nutshell, matching mortises are cut in the various mating parts, then a matching tenon is inserted upon glue-up. These were made using Festool's Domino mortiser. After the parts were all mortised, they were taped to catch as much glue squeeze out as possible...


Then all it took was gluing in several dozen little Domino tenons and getting them all to line up all at once! The trick in this kind of construction is to get good clamping pressure all the way across the joints. For this an arc-shaped clamping caul is a real life saver. A caul is piece of wood used to spread clamping pressure more evenly across a joint. You can see from the highly technical schematic diagram on the caul itself that one face is left straight, while the other is planed to have a slight arc; in this case, about a 16th to 3/32 inch at each end.


When the curved face is put against the work piece and clamping pressure is applied at the ends, the caul bows applying even pressure across the entire case width, without having to have deep-reach clamps.


The credenza cases are now off at the finisher's, and will get their drawers and doors fitted after finishing.

With those out of the way, it was time to dive into the curved display cases.

One of the big challenges of the display cases is ensuring uniformity, so that when installed next to each other, all the doors, drawers, etc., line up just right. To make that easier, positioning jigs were made from scrap MDF. These were simple square spacers made to help locate each part relative to the others before being joined....


Once all the flat pieces were joined, the double-thickness curved front piece was attached....


Once the basic case assembly was completed, the curved front was trimmed flush with the sides and the outer curved layers were added. Each case has two outer layers, each with a wave-form shaped edge. The process for each layer was the same, and included first trimming the layer to length, then cutting the wave shape, fairing the cut edge by hand (these steps were done with the work piece strapped to the original bending form for ease of handling), then finally gluing it on and applying band clamps....


Mounting of the two outer layers has to be done in the same order that the cases will be installed, so that when installed the wave shape flow smoothly from one cabinet to the next....


Two down, nine more to go!


Monday, May 2, 2011

The Gallery cabinets continue...

Well, the gallery cabinets are starting to roll now. The flat parts are nearly finished being cut, and the curved pieces are almost finished being glued up. The curved parts are all shaped using bending forms. I ended up making 6 different forms for the 8 types of parts needed.

For the toe kick fronts, the forms are simple - multiple layers of MDF with a curved edge, The 2" wide kick fronts are glued together by simply clamping the glued parts to the form ....


The curved display case fronts, though, require more complicated forms. The forms are made of ribs cut to the required radius, which are then joined with cross-braces and solid wood ends. This frame is then skinned with a layer of bending plywood....


Since the edge of each cabinet front layer will be shaped, the layers have to be veneered and bent separately before shaping, then the layers joined together. To maintain the correct radius of each successive layer, all three are glued up at once. It's a little tricky, but with a system, it works fairly smoothly. In a nutshell, each glue-up requires 7 components - the main layer is made of two pieces of bending plywood and a veneer covering, and the two outer layers each consist of one piece of bending plywood and one of veneer - after glue is applied to all surfaces, each layer's veneer and substrate are taped together to keep things from shifting .....


Next, the three layers are stacked and filler strips are added to maintain an even thickness throughout the entire packet. A hardboard caul is then added, and the whole packet is taped down to its form .....


Then the whole thing is put into a vacuum bag and pressed ....


You might also have noticed the big chalk arrows on the veneer faces - those are to help maintain a consistent grain direction an all parts. One of the great properties of the khaya (a type of African mahogany) that I'm using for this project is that, like all mahoganies, it has great luster, but the luster is directional. Meaning that if you were to rip a piece of wood into two halves and flipped one 180 degrees, the two halves would look different in terms of color (one being darker than the other). This is due to the directional nature of the wood fiber cells, and the way light refracts entering and exiting the cells. So, for a consistent look, its important to make sure all the cabinet fronts have their grain running the same direction - hence, the arrows!

Stay tuned .....

Wednesday, April 6, 2011

Swoopy Gallery Cabinetry

The latest adventure unfolding in the shop is a rare (for me, anyway) commercial project. It involves a number of cabinets for an art gallery in Sedona, Arizona. The project includes over a dozen partially glazed, curved-front jewelry display cases, three storage credenzas, and a couple of point-of-sale stations, all for a new retail space the gallery has just taken over.


The cases are being made using certified veneers of ribbon-grain sapele and khaya, two species of African mahogany. The overall layout of the display cases forms a very organic curvilinear space, and involves four different cabinet shapes, utilizing two different basic radii.


The curved fronts will be given even more dimensionality with the use of multiple layers, which will themselves have undulating edges. The combination of linear-grained veneers and curvaceous shapes will give them an exciting visual presence, but the use of consistent color and grain will ensure that what's inside the cases is the real star.


Stay tuned to watch this complicated project take shape ......

Thursday, March 17, 2011

Houston, The Behemoth Has Landed!

Well, after much work and luck, the desk has been delivered and assembled. One of the biggest challenges was getting the various components of the desk, a small drawer base, the huge 8' long side case, and the big walnut slabs, to all fit together. Since it bridges the two base cases, attaching the main desktop slab was the trickiest. Its attachment to the small drawer base was pretty straightforward - four solid aluminum posts were screwed to the underside of the slab with hanger bolts, then the case was lined up and bolted to the posts from the inside.


Attaching the slab to the long side case was a little trickier. In earlier posts I described both the battens that hold the slab flat, and the milling of two walnut rounds that support the slab. The trick was to mill shaped dadoes (grooves) into the rounds that would receive the batten and keep the slab aligned. This turned out to be easier than expected using the plywood sled that was used to mill the rounds in the first place.

Each round was remounted into the sled after it was marked with alignment marks so that the sled acted as a straight, constant edge that could be indexed against the tablesaw fence.


Then, with the alignment marks still intact, the rounds were lined up with each other and with the center of the case, so that they could be attached in line. Aluminum pins were then installed to maintain the alignment of the rounds and the batten, and to keep the batten from shifting.


Once everything was lined up, the slab covering the back half of the case could be positioned and attached, then the doors and drawers reinstalled, and voila.


As you can see, there's a second set of aluminum posts that support a floating frosted glass shelf, as well as aluminum drawer and door handles, which tie the whole piece together. For a little extra flair, the panels on the fronts of the cases are veneered with custom cut pieces of figured walnut. In the end, this desk, which has both natural and tailored design features, as well as both rustic and sophisticated detailing, comes together as a unified whole with a one-of-a-kind presence.

Thursday, February 10, 2011

The Desk Keeps Moving Along

Greetings. The big statement desk has been moving right along the past couple of weeks. In the last post I ended by showing some of the parts of the web frames that make up the main desk pieces. Since then, the frames and panels have been assembled and prefinished ...


... and the cabinet carcasses have been glued up, finished, the drawers installed, and the drawer fronts fitted. Below you can see the various stages....top - the glued up parts are dry assembled to assure proper sizes and fit (you can see how the prefinished panels are taped off to protect them as the frames are finished); middle - the glue-up of the finished pieces; bottom - the unfinished drawer fronts test fitted to check size and alignment.


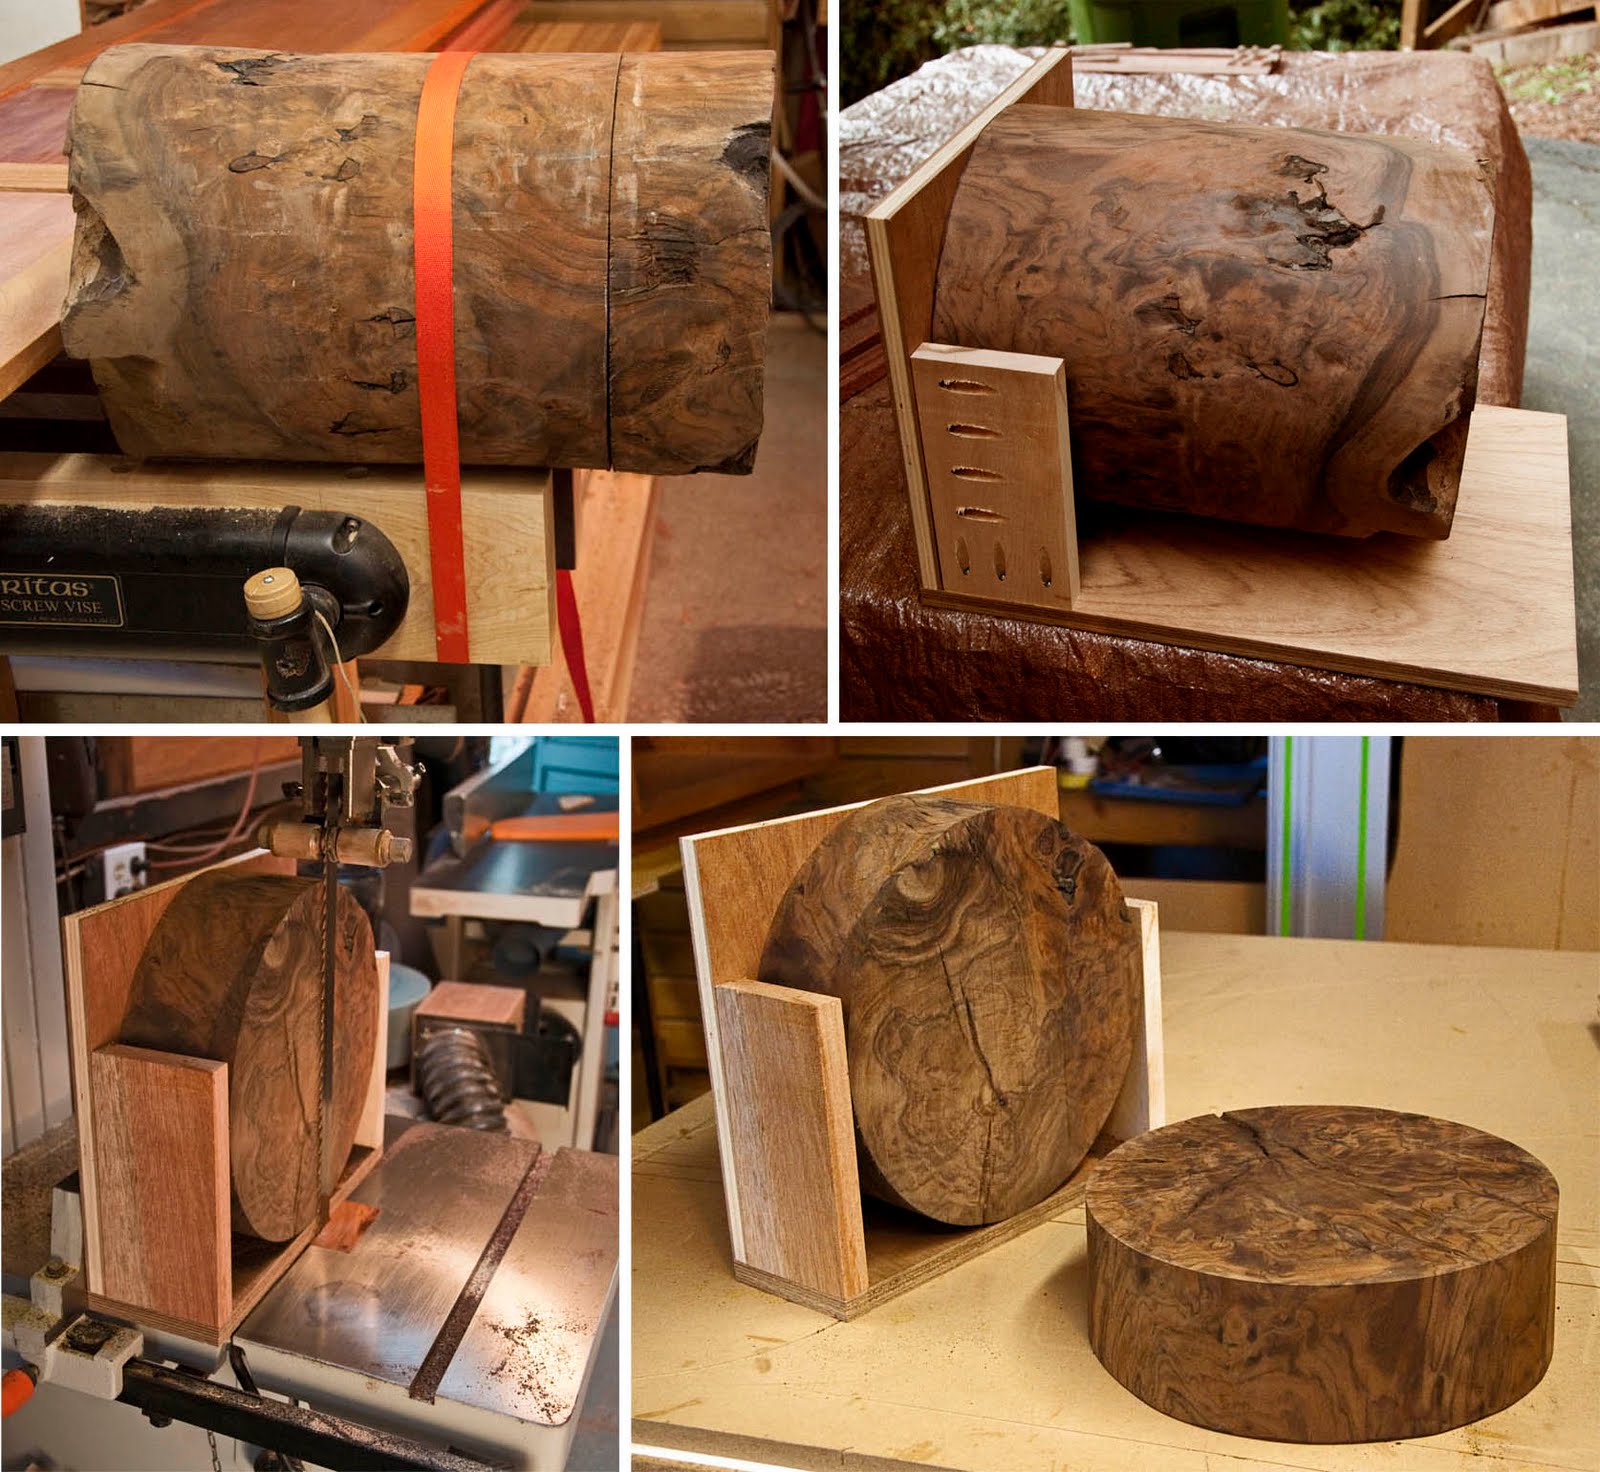
Another unique feature of this desk's design is that the desktop slab will be floating about the storage cabinets. On one side the top will float on two wooden disks made from the ends of veneer logs. To make the disks, a two foot round was first squared off. Next, because the round was unevenly shaped, I made a plywood sled to help feed it through the band saw safely. Then the disks were sliced sequentially by mounting the round to the sled.


Now its time to complete the finishing, and put it all together. Stay tuned!

Monday, January 24, 2011

Museum Show Chiffonier

Here's the next installment on the making of the chiffonier that I'll be showing at the Santa Cruz Museum of Art and History show the coming summer.

Two of the most distinctive elements of this piece's design are the sculpted bonnet and base. Both are made of wenge, a dark, dense, black/brown wood, that will give weight to and ground the piece. Both are stack laminated and then shaped. This series of photos shows the steps involved in making the bonnet:

First, pieces are face-laminated to achieve the required thickness for shaping. In this case, to accommodate the width of the part, it was made in three sections and then glued together after shaping (you can see the mortises for the floating tenons that will help with both alignment and glue joint strength) ....


Next, the built up blanks are rough cut to shape on the band saw....


Finally, the subparts are glued together and the entire piece is shaped ....


The base was created in much the same way, with the pieces in each layer being bandsawn roughly to size before glue-up, then the whole part being shaped afterward ....


Stay tuned for the next installment on the making of this piece, when I'll talk about the distinctive features of it's seven drawers.