Saturday, November 16, 2013

A Special Legacy Project

Even though the furniture I create for my clients is always specially designed for each of them and their environment, the materials used to execute the designs, while of high quality, are usually commercially sourced.

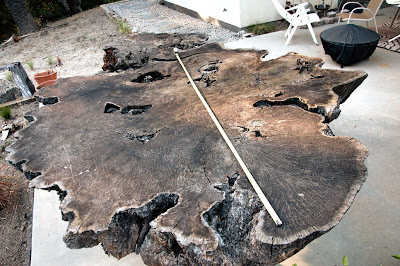
By contrast, I've recently been given the opportunity to undertake a very special legacy project. A client recently contacted me with a very interesting challenge. She said she had a large redwood slab that she wanted turned into furniture. Turns out, "large" was an understatement! For reference, the tape measure in the picture below,  is extended 8 feet.


In all, the slab measured better than 8' by 12' by about 11" thick. It was milled from an old-growth stump on the property by her late husband, and functioned as an outdoor table for 12 years. Now she wanted to repurpose the material into furniture pieces for herself and her children. 

Obviously, the first step was to parse the slab into managable pieces in order to assess how much usable material there really was. A task that required two trips, and was helped greatly by my friend Matt Werner.


And boy, we got quite a pile.


My biggest fear was that after 12 years outdoors, the many cracks and splits in the surface might have allowed weathering and rot to extend far down inside. But to my surprise, once we started cutting, we found that only the very surface was weathered, with perfectly fresh material underneath - a testament to the weather-resistance of redwood.


The bigger problem will probably turn out to be pockets of rot caused by water being trapped underneath the slab by plywood that was used as a sub-assembly to attach legs.

The next step will be to take the slabs to a sawyer to have the top and bottom surfaces exposed and flattened .... stay tuned!



Curvy Nightstands Slide through the Home Stretch

Once the outsides of the legs were shaped it was time to shape the front faces of the legs to better define their curvy shape. This was done using a simple jig and pattern-following router bit while the case was dry-fit together.


The last step for the case parts was to finish the joinery - the shelves were joined to the sides with Dominos, while the top was joined with dowels. The latter were located using a simple shop-made positioning jig.


The bodies then went together very nicely, albeit with a lot of clamps!


The next step was to add the drawers, and of course, curvy sides deserve curvy drawers (or at least drawer fronts). To ensure smooth running of the drawer slides, the inside of the case was made square, but the drawer fronts were shaped to follow the curvature of the legs faces. Once the drawers were mounted, handles were fashioned out of solid wenge to match the rest of the accent trim.

The final result was very satisfying.


Now they just have to make their way to the other side of the country!

Thursday, October 3, 2013

Sledding Through the Curves

How do you make a perfectly fair curved surface out of solid wood that's 20" wide , 28" long, and almost 3" thick? That was the challenge of the latest project in the shop. The project is a pair of nightstands made of solid mahogany, and based on a Klismos-inspired stool I made last year. 


I know what you're saying .... go find a 20" capacity bandsaw and just cut the curves. Easier said than done, and then there would still be the challenge of building a jig to keep the slender blank perfectly perpendicular to the saw table - no easy feat. Ultimately, I decided to stick with the equipment I had, for convenience. Since I only have a 12" capacity bandsaw, and the premium pattern-grade Sapele I was using was only about 6-8" wide, the sides would have to be glued up in three pieces.


To strengthen the joints, I added dowels, which were positioned properly in the blank using a shop made drilling jig.


After the dowel holes were drilled, the outline of the side was cut using the bandsaw. The blanks were then glued up and set into a fairing jig. 


The fairing jig works with like the setup often used to flatten large slabs with a router. The sides of the lower part of the jig are the exact fair arc that describes the curve of the nightstand side. Riding across these is a sled, along which a trim router rides. As the sled moves along the curved rails a series of narrow flats is created.


The faired surface can then be sanded smooth, resulting in a fair curved nightstand side. 


Bandsawn blank (L), rough faired blank (R), and sanded fair side (bottom).

The faired sides can then get their joinery cut and the nightstands take shape - stay tuned....


Transformation Complete

Well, its been a while since the last post about the boat salon tables, but they are finally finished, and look great. After wenge edging was applied to the tops and bases, they went to the finisher and got a high gloss boat-worthy finish. 


The afromosia is a great match for the rest of the interior, and they now look like they belong. A special thanks to John Gilham finishing for doing a great job with the finish.

Sunday, July 7, 2013

Ship Shape Transformation

Greetings again, everyone. In the shop right now is an interesting commission that's somewhat different form my usual work. In this project, rather than designing new pieces, I've been asked to transform a pair of adjustable-height tables from weird to sleek and stylish. The nice part about these tables is that they have an internal hydraulic piston that adjusts their height from coffee table to dining table - a nifty feature in a boat salon where space is at a premium. The not-so-nice part about them is that they are made of an odd combination of thick slabs of clear acrylic and black-painted bamboo canes.


My job is to turn them into something stylish and compatible with the rest of the boat's interior. To do this I'll strip off all the bamboo, and then re-skin the uprights and fabricate new bases and tops using Afrormosia veneer to match the rest of the interior. Afrormosia is sometimes referred to as African Teak, and is the primary species used throughout the vessel. Here's the rendering of what we're shooting for.


The first step was to disassemble the tables and strip off all that bamboo from the base tubes. They were then sanded and clad with a skin of thin MDF as a smooth substrate, and finally veneered.


The new tops and bases consist of two layers of marine plywood that are veneered top and bottom with Afrormosia using a vacuum bag. Once the tops were made, the next step was to mill and assemble the compass roses. Made from wenge, the rose parts were cut using a simple jig on the bandsaw that allowed milling of identical multiples. The parts were then glued together as a single piece and inlaid into the tops.


To inlay the roses, the outline was traced onto the top and a recess was cut, first with a router, and then refined with chisels. 


Once the recess was prepared, the rose was glued in just proud of the surrounding field.


Each rose was then levelled using a rounter on a carriage similar to those used to flatten large slabs. The flat bottomed router bit was adjusted to trim flush with the surface of the top.


After levelling, some ebony stringing was added to enhance the design, and then the whole thing was sanded flat.


Next up will be to add solid wenge edging to the tops and bases. Stay tuned.....


Tuesday, February 12, 2013

Monumental Coffee Table Hits the Mark

Now that you've seen what went into making this massive coffee table, here's the final result. 

Because of the size and severity of the check line along one side, the slab had to be stabilized from both sides. Because I didn't have to worry about aesthetics on the underside, I added a full complement of butterflies along the entire length, to add extra stability.


And here's the final result after finishing with polyurethane....


Hope you enjoyed hearing about the process of making this table. I think it turned out pretty well, if I do say so myself - but most of the credit goes to Mother Nature for the real star of the piece, the wood.

Wednesday, January 9, 2013

The Coffee Table Base

Once the top was shaped, flattened and sanded, it was time to tackle the base. The base of this table consists of only four parts. The legs and bottom rail are half-lapped together, which is a pretty simple joint to cut, normally, but in this case the legs are canted out at a 10 degree angle. Cutting the angled joint is still pretty straightforward, but requires an extra jig, and some thoughtful planning.


The secret to a well-fitting joint is to do all the angled milling operations with the same table saw blade setup.  After setting the blade to 10 degrees, I first trimmed the top and bottom faces of the legs. Next, without moving the blade, I cut the angled half-laps in the bottom rail. To do this, I used a crosscut sled. You can also see in the photo how the rip fence and a stop block defined the limits of the cut as the material is nibbled away. That meant that I could cut both sides with only a single setup by just flipping the rail, yielding two dadoes exactly the same size and perfectly symmetrical.


While the blade was still tilted, I also cut the front and bottom parts for the leg dadoing jig. This jig was used in conjunction with my normal 90 degree crosscut sled to cut the mating dadoes in the legs. Stop blocks again defined the limits of the cut, and allowed me to cut both legs with a single setup. The same sled setup was also used to cut the dadoes for the upper rail.


The ragged edges left by nibbling with the table saw were cleaned up with a chisel, and with all the joint halves cut using only two setups, there was no doubt that the joint would fit properly.


Now that the joinery was cut, the various parts could be shaped. First, the bottom rail's upper half was given a parabolic arched profile. Using a paper template, the shape was drawn onto the rail ends, and the majority of the waste material removed with a couple of passes on the table saw. The profile was then refined with a plane, scraper, and sander. By leaving the lower half of the rail square, the joint was fully maintained.


Shaping of the legs was done in two steps. First, the outer edges were curved to give a softened trapezoidal outline. This was done on the band saw, and then faired with a belt sander.


Next the sides of each leg were given a thumbnail profile. This was done by first laying out a center line down the face and relief lines on each side, then using a compass to lay out the curve.


Then it was back to the plane and sander to fair it all out. The base was now complete and ready for finishing.


Sunday, January 6, 2013

A Monumental Coffee Table

Well, its a new year and its time to get back to the too-ignored blog. So here goes.


Currently in the shop is a very substantial coffee table, made from 3" thick slabs of Claro walnut. 


Unfortunately, unlike the rendering, the actual top slab has some significant checking going on, so first order of business was to get that under control. This is an air-dried slab, so its moisture content is only down to about 12%. That means it'll experience more seasonal movement than a fully dried piece would, but the big crack can be stabilized using butterfly keys (a technique popularized by the great George Nakashima). The first step was laying out a pleasing arrangement, which I did with paper cut-outs of various sizes.


After the layout was set, the butterfly keys were milled from 4/4 wenge stock using a simple band saw jig.


Once the keys were milled and inlaid into both the top and bottom surfaces, the edges were shaped. The curves were rough cut with a jig saw, then faired using a hand plane and sanders. You can see the installed butterflies in the photo, as well.


Here's what it looks like with all the edges shaped and faired.


Check back periodically over the next few weeks to see how the base unfolds....